I was recently involved with a daemon-style Java project that needed a simple installer solution for OSX. We didn’t require a huge amount of sophistication from the installer. So we opted for flat packages. Flat packages are simple, self-contained files that are easy to pass around.
Prior to Leopard (10.5), packages weren’t flat at all. They were bundles, which are just folders that OSX treats in a special way. Bundles contain a variety of files. Package bundles, for example, contain files used as part of the install process such as a bill of materials, the application payload, and a collection of localized resources among other things. Previously, if you wanted to distribute one of these packages, you’d have to put the package inside a DMG or tar it up.
Another interesting thing happened during the evolution of OSX packages. PackageMaker, a wart in the eyes of many developers and source control systems, was officially deprecated and dropped in Xcode 4.6 (and there was much rejoicing :-)). Developers were left with three terminal-based utilities that could be used to build packages – pkgbuild, productbuild, and pkgutil.
For more information on the evolution of OSX packages, I highly recommend reading this MacTech article which goes into the subject in some depth.
pkgbuild
pkgbuild is a tool for creating a very basic, bare-bones component package. The resulting package will contain the payload for a single component. It also supports preinstall/postinstall scripts. And that’s about it.
productbuild
productbuild is a tool for creating a “product archive”, which is kind of like a super-package. I like to think of it as a package of packages. But it’s really so much more. You can customize the UI, as well as explicitly declare installation prerequisites such as the minimum required RAM, OS version, etc. Even JavaScript is supported for some things. If you create apps for the Mac App store, this is the tool you’ll be using to build your packages.
pkgutil
pkgutil is kind of like a Swiss Army knife for packages. With pkgutil, you can rip a package apart and then put it back together again. It doesn’t matter if it’s a product archive or a component package. If it’s a pkg file, pkgutil can work with it. It also provides a number of options for examining package contents and performing tasks like package verification and repair.
I’m going to give a quick overview on how I use these three utilities to build the flat package for our product. This approach can be adapted for your own needs.
Simple Component Packages
If you want to create a very simple package for a single component application, the easiest tool for the job is pkgutil. A complete list of options for pkgutil can be found on the man page. But here are the ones that are important.
--root – This option specifies the location of the source content you want packaged up. This can be a path containing anything. Our own application is Java-based and is nothing more than a folder of JAR files. We simply point --root to the folder containing all of our JAR artifacts.
--component – You can use this option as an alternative to --root. With --component, you’re being a bit more specific by giving pkgbuild the path to a component bundle. This might be an app bundle, a browser plugin bundle, etc. Why would you use this option instead of --root? If pkgbuild knows it’s working with a bundle, it can infer some of the other configuration options it needs, such as package identifier and install location.
--identifier – The identifier is a unique string that identifies your component. The normal convention for the identifier resembles something like a backwards domain. You start with a TLD, then follow that with a company name or developer name, and then follow that with a product name. So an identifier for Roadie Assist (not an iOS or OSX app, but could be someday) might look like “com.shanekirk.roadieassist” (this is indeed the package name on the Google Play store). There’s certainly flexibility in how you name your package IDs. They just need to be unique. But don’t deviate too much from the convention. It’ll only cause confusion.
--version – This is a monotonically increasing number. The idea is that every time you release a new version of the component, you need to increase this value. Otherwise, the upgrade process may fail. If this value isn’t set, pkgutil defaults with a value to 0. (Tip: If your build system keeps track of build numbers, consider using that as your package version. If the whole thing is automated with scripts, you’ll probably never have to think too much about this value again.)
--install-location – This is where you want to place the component on the target system. For instance, if you’ve built an application bundle, you’ll probably want to place it in /Applications on the target machine.
--scripts – Packages support a number of scripts that are invoked during the install process. If you have a script called preinstall, this will be invoked before the component is installed. If you have a script called postinstall, it will be invoked after the component is installed. The --scripts option specifies where you’re storing these scripts. The scripts can be in any language so long as the files are marked executable and have the appropriate shebang indicating the path to the interpreter. If either of the scripts return a number other than 0, Installer assumes a failure occurred and the installation halts.
A typical invocation of pkgbuild might look like so…
pkgbuild --root ./stagedfiles --scripts ./scripts --identifier com.example.myapp --version 1 --install-location /Applications mypackage.pkg |
pkgbuild --root ./stagedfiles --scripts ./scripts --identifier com.example.myapp --version 1 --install-location /Applications mypackage.pkg
For many folks, this may be all that’s needed. From within Finder, you can double click the resulting package and component can be installed without having to do much else. If you would like to customize the UI a bit, allow for a more “componentized” installation, or distribute your application through the Mac App store, you’ll need to use productbuild.
Product Archives with productbuild
Much of what you can do with pkgbuild you can also do with productbuild. But don’t be fooled. Product archives and component packages aren’t quite the same thing. Synthesizing a distribution from a product archive (package created with productbuild), for example, will fail, but doing the same thing with a component package (package created with pkgbuild) works just fine (have no idea what I just said? Don’t worry. You will soon.) With productbuild, you can also customize quite a bit of what the end user sees. If you peruse the man page for productbuild, you’ll find that many of the command-line options you used with pkgbuild are there for productbuild as well. But you’ll also see a few other things mentioned like plugins, distribution files, resource folders, etc.
Regardless of how you created your package, you’ll probably want to update the UI or perform more sophisticated prerequisites checking. To do this you’ll need to create a distribution file.
A distribution file is just an XML file. It’s used to configure both look and feel, as well as behavior, of the package installer. The idea is that you create this file and then use productbuild to create a new package from the old one and the new distribution file. Confused yet? Let’s work through an example.
productbuild example
Let’s assume we have a package called mypackage.pkg kicking around (if you’re reading closely, you’ll notice this is the same package I use as an example above while discussing pkgbuild.). Our goal is to change the title and background image shown to the user. So we need to create a distribution file and modify it to suit our needs. Fortunately for us, productbuild is able to synthesize a skeleton distribution file for us.
productbuild --synthesize --package ./mypackage.pkg distribution.xml |
productbuild --synthesize --package ./mypackage.pkg distribution.xml
Note that this only works against component packages created with pkgbuild. If you try to do this against a pkg created by productbuild, it’ll result in an error. The resulting XML will look something like the following.
<?xml version="1.0" encoding="utf-8" standalone="no"?>
<installer-gui-script minSpecVersion="1">
    <pkg-ref id="com.example.myapp"/>
    <options customize="never" require-scripts="false"/>
    <choices-outline>
        <line choice="default">
            <line choice="com.example.myapp"/>
        </line>
    </choices-outline>
    <choice id="default"/>
    <choice id="com.example.myapp" visible="false">
        <pkg-ref id="com.example.myapp"/>
    </choice>
    <pkg-ref id="com.example.myapp" version="1" onConclusion="none">mypackage.pkg</pkg-ref>
</installer-gui-script> |
<?xml version="1.0" encoding="utf-8" standalone="no"?>
<installer-gui-script minSpecVersion="1">
<pkg-ref id="com.example.myapp"/>
<options customize="never" require-scripts="false"/>
<choices-outline>
<line choice="default">
<line choice="com.example.myapp"/>
</line>
</choices-outline>
<choice id="default"/>
<choice id="com.example.myapp" visible="false">
<pkg-ref id="com.example.myapp"/>
</choice>
<pkg-ref id="com.example.myapp" version="1" onConclusion="none">mypackage.pkg</pkg-ref>
</installer-gui-script>
So far, so good. Let’s first change our package title. We want the title to be “My Example Application”. Open the distribution XML with your favorite text editor. Within the installer-gui-script element, create a new child element called “title” and set the element’s character data appropriately. It should look something like this.
<title>My Example Application</title> |
<title>My Example Application</title>
Now let’s create a new background image for our installer. The recommended size for the background image is 620×418. The background image I’ll be using for this is example is a simple PNG as shown below.

Create a new folder for your installer resources and place the image in there. We’ll call it the file background.png.
Now, let’s add the PNG reference to the distribution.xml. Open the XML file and within the root installer-gui-script element, create a new element called background. Add two attributes, one called “file” that simply names the file and one called “mime-type” that describes the image type. For example, your background element might look like so.
<background file="background.png" mime-type="image/png" /> |
<background file="background.png" mime-type="image/png" />
Save your changes. Now we just need to create a new package with our modified distribution file. Using productbuild the command might look like so.
productbuild --distribution distribution.xml --resources ./myimages --package-path ./mypackage.pkg myimprovedpackage.pkg |
productbuild --distribution distribution.xml --resources ./myimages --package-path ./mypackage.pkg myimprovedpackage.pkg
This command produces a new package called myimprovedpackage.pkg that has the new modified background image. If you double click on it with Finder, you should see your new background image, but it should also install the new package just as it did the old one.
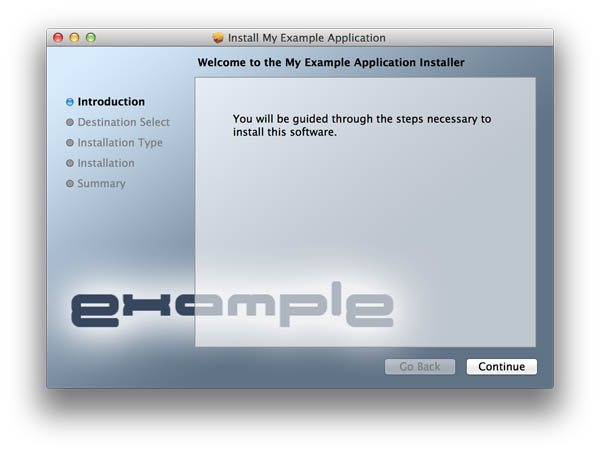
For a complete list of everything you can do to a distribution.xml, check out the distribution xml schema reference. You’ll find that there’s a lot of flexibility in what you can do to your packages. There are some things I always do, such as customize the welcome, license, readme pages, run JavaScript as part of the startup validation, and limit install locations to the root volume. But I’ll save discussion of those types of things for a future blog post.
Injecting Files Into Flat Packages
At some point in your journey with flat packages, you’ll find that you can’t get something into the package file that you really think should be there. This might be an extra script or even an Installer plugin (a topic that deserves its own blog entry). Both pkgbuild and productbuild promise to copy content out of the scripts or resources folders, but sometimes they just don’t. So we need to get these files into our package. That’s where pkgutil comes in.
pkgutil allows you to expand a package to a folder structure like so.
pkgutil --expand myimprovedpackage.pkg expandedcontent |
pkgutil --expand myimprovedpackage.pkg expandedcontent
This creates a folder called expandedcontent that contains the expanded content of the package. If you explore the folder structure, most of what you see will only make sense if you’re familiar with the structure of the original package bundles. I strongly advise you to read up on the history of the package format I mentioned in the beginning to be effective at shuffling stuff around within these folders.
Once you’ve got things where they need to be, then you can flatten everything again like so.
pkgutil --flatten expandedcontent myimprovedpackage.pkg |
pkgutil --flatten expandedcontent myimprovedpackage.pkg
Conclusion
And that’s it. I realize I glossed over a lot of interesting stuff with regards to the distribution XML file. Experiment with it. I hope to write a followup to expand on some of these topics in closer detail. If you have questions, post them!
